
Christmas countdown // easy nail arts
Whoopsie this Christmas countdown article is also one day too late… But it was so busy lately… Much work with school and of course the press days! This week my report about the press days will come online! But today it is all about my Christmas countdown article! And with Christmas that is coming closer and closer my article will be a diy or looks or about the best gifts,… And today it’s all about the nails! I know that nail art isn’t that easy. So I choose 3 nail arts that are easy to make! And one of them is also perfect to pimp your gel nails! At this moment I have gel nails but I still love to create some nail arts! Oh, and if you are interested in an article about gel nails with tips and the pro and cons just let me know! 🙂
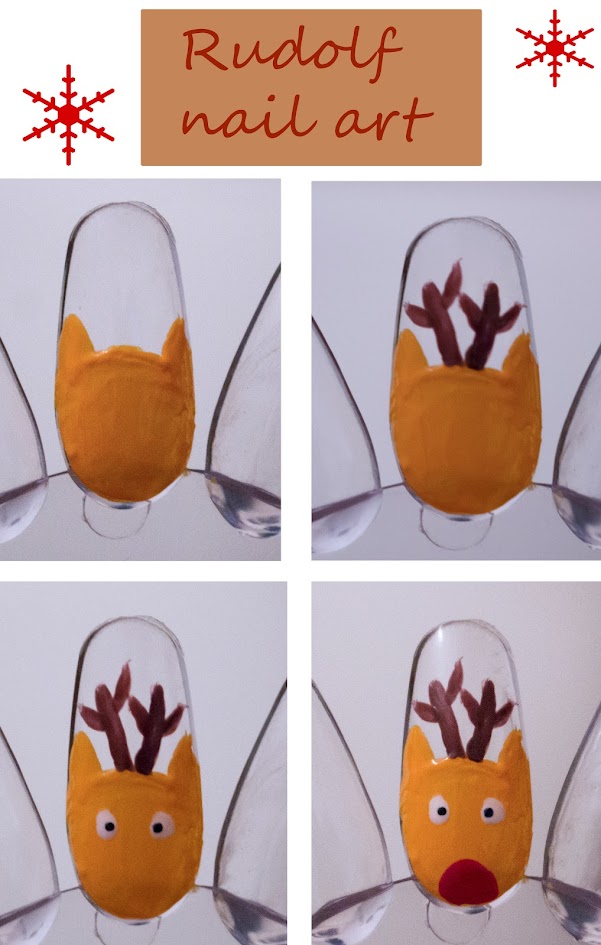
Rudolf nail art
What do you need?
A small pencil or dotting tool, two brown colors a light one and a darker and white, black and red nail polish.
How to make this cute Rudolf?
You can choose a base color like white for the background. When this is dry you use the light brown color to make a big oval with some ears. Now it’s time to make the antlers with the brown color. Let this dry and now you can try to make the eyes. The best way to do that is with the dotting tool. But you can also do it with a small pencil! After that Rudolf is almost ready the only thing that is left is to make the red nose! You can draw this Rudolf on one nail and choose to paint your other nails in the red color from the nose or the lighter brown one or…

Glitter, glitter and more glitter!
This ‘nail art’ is perfect for nail polish but also for gel nails! It’s an easy way to give your nails something shinny!
What do you need?
A sponge, glitter nail polish and a color that you love to paint your nails
How to make this?
Paint your nails in the color you want. When this is dry you paint your ring finger with the glitter top coat. For the rest you use the sponge. So you lay a thin layer glitter top coat onto the sponge and dab this onto the top of your nail.
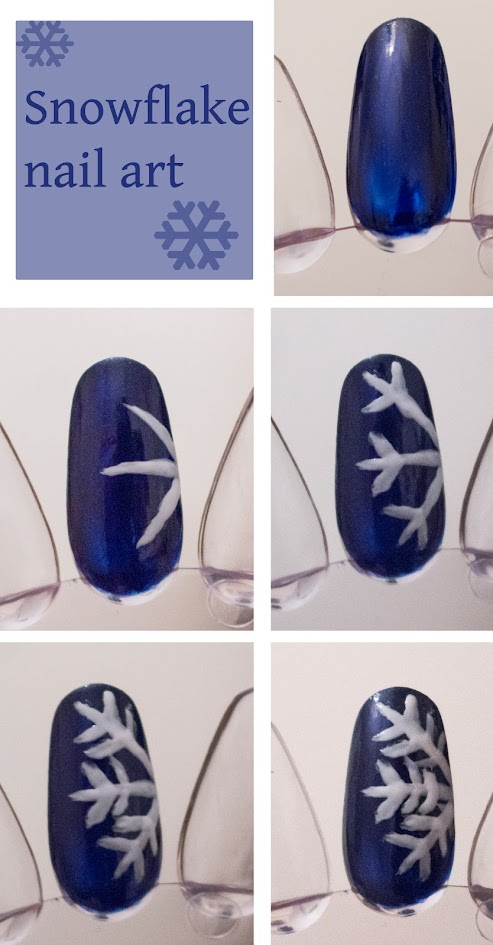
Snowflake nail art
What do you need?
A small pencil and a blue and white nail polish
How to make this snowflake nail art?
Start with the blue base color and let this dry. Than start with your snowflake by painting three stripes as small or big as you want! Add a few spiky details on each stripe to create a snowflake.
These were my three easy Christmas proof nail arts! I hope you loved this article! And don’t forgot to seal you creation with a top coat!
Lots of love xxx
You can follow me on
– youtube


